- Bulk AOIs Setup
- AOI suggestions
- Creating and Editing AOIs
- Editing and renaming AOIs
- Hiding and deleting AOIs
- Copy-pasting AOIs
- Guidelines for creating AOIs
- AOI Tracking for Video
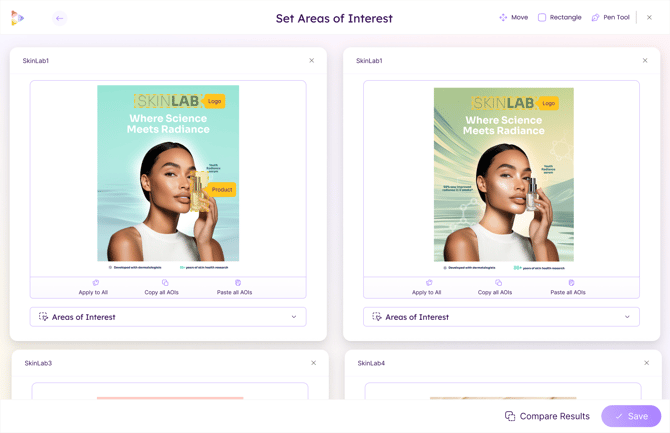
Bulk AOIs Setup
Need to configure several assets at once? The Bulk Setup flow makes it quick and effortless.
-
Select your assets
Click the thumbnails of the assets you want to include. This activates the toolbar—then simply choose Bulk Setup to get started.
-
Define your objectives
Set the objectives for your selected assets. Once defined, the platform automatically suggests relevant Areas of Interest (AOIs) based on those objectives.
-
Refine your AOIs
In the AOI Bulk Setup step, you can draw, edit, or reuse existing AOIs. Apply them to all assets at once or customize them individually—whatever suits your workflow best.
-
Save or compare
When you’re finished, select Save Selection to return to your folder view, or Compare Results to save and move directly into comparison mode.
AOI suggestions
Whenever you upload and predict an image or video, AOIs are automatically detected for you and suggested in the AOI suggestions panel:
 Images: AOIs suggestions are created for Branding, Product, Headline Text, Body Text and Call to Action.
  Videos: Branding AOIs are auto-detected and tracked throughout the video. You can now also draw your own AOIs on any element and let AI track them across the footage. See Manual AOI Tracking for Video below
- Hovering over each AOI suggestion would show the AOI in the creative panel.
- Select the AOI instances most relevant for your analysis to add the AOI-specific benchmarks to the assessment of your creative.
In addition to the overall results, video AOIs also provide results for every individual frame throughout the video. These results shown directly on the video, as well as displayed together with Cognitive Demand and Focus in the graph below the video to visualize the AOI impact over time.
The video AOI for Branding is also autodetected and suggested on our AOI suggestions panel.
Neurons's AOI detection model is a proprietary object detection model based on
deep learning, using advertising materials to automatically detect five types of areas: Branding, Product, Headline text, Body Text, and Call to Action.
Fine-tuned on 10,000 images, our model outperforms the Google Vision logo detection model by 40%.
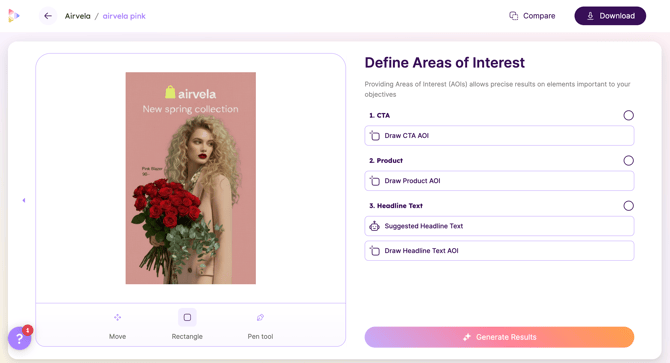
Creating and Editing AOIs
To calculate the impact for a specific element in creative, you have to select an AOI and confirm your selection from the AOI suggestions.
If an element should be an Area of Interest or the bounding box of the suggested area is not precise enough for you, our AOI tools give you the freedom to fully customize the shape of your AOI, so you can ensure it fits any element.
 Draw rectangle: Click and drag anywhere on the image to create a rectangular AOI.
 Draw polygon: Click around your element to create the corners of the polygon, and finish the AOI by clicking on the first corner you added.
All AOIs are shared across all the predicted maps, which means you can create your AOIs on any map to calculate all types of impact for that element!
Editing and renaming AOIs
Editing AOIs
If the shape of your AOI doesn't quite fit the element in the way you wanted, there's no need to start over. Simply click on the move button so you can edit the AOIs.
Renaming AOIs
To change the name of an AOI, hover over the AOI on the image or in the AOI panel on the right side, and click the ![]() icon that appears. In the window that then opens, you can change AOI Name and then click Save.
icon that appears. In the window that then opens, you can change AOI Name and then click Save.
Hiding and deleting AOIs
Hiding AOIs
AOIs can be turned on and off individually by clicking on the ![]() toggles next to each AOI in the AOI panel on the right side of the screen.
toggles next to each AOI in the AOI panel on the right side of the screen.
You can also turn off all AOIs by clicking on the ![]() Show AOIs toggle in the left toolbar or in the top right corner of the AOIs panel.
Show AOIs toggle in the left toolbar or in the top right corner of the AOIs panel.
Deleting AOIs
To delete an AOI, hover over the AOI on the image or in the AOIs panel on the right side, and click the ![]() icon that appears. In the window that then opens, click on the
icon that appears. In the window that then opens, click on the ![]() Delete AOI button to delete the AOI.
Delete AOI button to delete the AOI.
To quickly delete single or multiple AOIs, you can also use the ![]() Move and resize tool to select AOIs by dragging a box over them or clicking them individually while holding the Shift key, and then clicking the Delete or Backspace button on your keyboard to delete all selected AOIs at once!
Move and resize tool to select AOIs by dragging a box over them or clicking them individually while holding the Shift key, and then clicking the Delete or Backspace button on your keyboard to delete all selected AOIs at once!
Copy-pasting AOIs
Quickly compare impact on similar areas by copy-pasting AOIs from any image to any other image in Neurons AI, so you can be sure the AOIs are exactly the same.
- Open the Comparison view.
Choose the assets you want to compare. - Select your copy-paste option.
- Option 1: Apply all AOIs — Automatically applies all AOIs from one asset to every other media you’re comparing.
- Option 2: Copy all AOIs — Allows you to manually choose which media to paste the AOIs to.
- Save the selection to keep your current setup for later, or
- Compare the results to open the Compare View, where you can analyze the assets side by side.
Copying an AOI in comparison view
Guidelines for creating AOIs
AOI Annotation Guidelines
How to set up Areas of Interest consistently in Neurons AI
Why consistent AOI setup matters
Areas of Interest (AOIs) are the labelled elements you draw on a creative in the Neurons platform. They allow the platform to calculate specific impact scores — such as how much attention your CTA receives, or how well-remembered your branding is.
Because scores are calculated relative to the AOI boundary you draw, inconsistent setups lead to incomparable results across assets or teams. This guide ensures everyone marks up creatives the same way, so your data means the same thing across the board.
What is an AOI?
An AOI is a bounding box drawn around a specific element of your creative. Once drawn and labelled with the correct type, the platform calculates how that element performs across all metrics: attention, focus, cognitive demand, engagement, and memory for images, and attention metrics for video and mixed media.
The platform will auto-suggest AOIs when you upload an asset - but these suggestions should always be reviewed and adjusted to ensure accuracy. For bulk uploads, use the Bulk Setup flow to apply AOIs consistently across multiple assets at once.
Impact Score reminder: Impact Scores are measured out of 10 and compared against a benchmark relevant to your asset's purpose, use-case, and industry. A score of 7 or above means the creative is predicted to work well for your objective. A score of 5 or below indicates it needs optimisation.
AOI type definitions
There are five AOI types. Use the table below to determine which label to apply to each element. Multiple instances of the same type (e.g. two CTA buttons) should each be annotated — see the Multiple instances section for details.
|
AOI Type |
Definition |
Examples & Edge Cases |
|---|---|---|
|
Branding |
The brand's logo, iconography, or brand name written in the brand's own font. Branding on the product itself (e.g. label on packaging) still counts as Branding. |
✓ Logo mark ✓ Wordmark in brand font ✗ Brand name in a generic/headline font ✗ Product packaging shape alone |
|
Product |
Physical products only — in packaging or with branding visible. Prefer 'out of use' shots (product standalone) over 'in use' shots. Parts of a product can be annotated if the product is clearly identifiable. Apps, services and software are excluded. |
✓ Milk carton with branding ✓ Beverage can ✗ Glass of milk (no packaging) ✗ App screenshot |
|
Headline |
The primary message of the ad — the main text element the viewer is meant to read first. There can be more than one headline (e.g. on print ads or multi-section pages). |
✓ 'Scare Your Thirst.' (main headline) ✗ Supporting copy below the headline |
|
Body Text |
All other supporting copy: sub-headlines, supporting messaging, disclaimers, legal text. If there are multiple blocks, number or name them as separate AOIs. |
✓ Taglines ✓ Disclaimer text ✓ Sub-copy below headline ✗ Illegible or decorative text |
|
CTA (Call to Action) |
Any element prompting the viewer to act. Includes: buttons, QR codes, URLs or addresses with directional language (e.g. 'go to...'), and action statements (e.g. 'Try now', 'Don't miss out'). Include surrounding supporting copy if it forms part of the call to action. |
✓ 'Shop now' button ✓ QR code ✓ 'Visit brand.com' ✓ 'Don't miss out - offer ends Friday' |
How to draw bounding boxes
Add a slight margin - always
Every AOI should be drawn with a small amount of padding around the element, not tightly cropped to its exact edge. This accounts for the 'halo effect' - the natural spread of attention around an object's edges that the platform's model captures.
A tight crop will miss attention signals that fall just outside the element, leading to an underestimate of how much viewers engage with it.
Merge overlapping elements into one AOI
When multiple instances of the same element type appear close together or overlap (this is most common with Product AOIs), draw one merged bounding box around all of them - not individual boxes for each. This matches how benchmarks are collected and produces more accurate results.
Note: it is fine for different AOI types to overlap. For example, if a brand logo sits on top of a product, the Branding AOI and Product AOI will overlap - that is expected and correct.
Visual examples
The examples below use the same creative to show the effect of different bounding box approaches on the reported attention score.
|
✗ Too tight (16.5%) |
✗ Split boxes, overlapping (44.2% + 49.7%) |
✓ Single box, padded (19.6%) |
✓ Merged, padded (62.1%) |
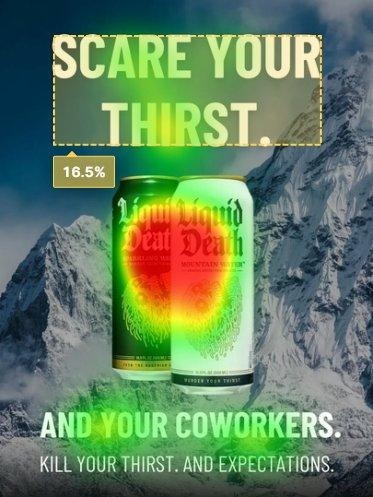
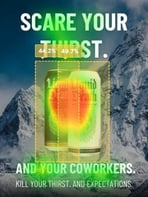
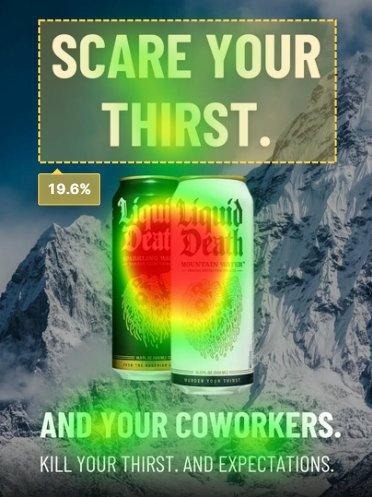
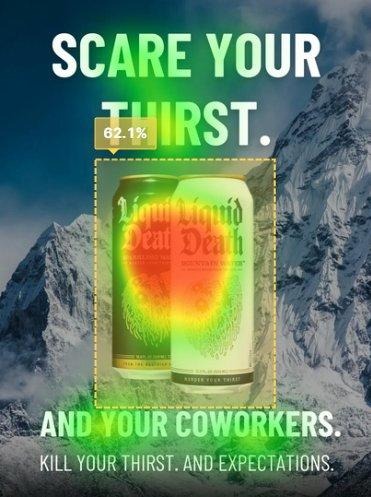
The merged, padded boxes are the correct setup. It captures the full attention directed at both cans, including the halo around each. The split boxes artificially divide attention between two AOIs, while the tight box undershoots by cutting off attention at the edges.
Multiple instances of the same AOI type
It is perfectly fine, and often correct, to annotate multiple instances of the same AOI type on a single creative. This applies to all five types: a creative can have two Branding AOIs (two different brand logos), two Headline AOIs (a print ad with two distinct headline areas), or three CTA buttons.
Naming convention: When labeling multiple instances of the same type, number or name them from top-left to bottom-right.
Multiple instances do not affect benchmarking. Benchmarks are set at the AOI type level, not per individual instance.
Reading your results
AOI attention scores
The attention figure shown on each AOI represents the percentage of total viewer attention that falls within that area during the exposure. This means all AOI attention percentages on an image do not need to sum to 100% - unlabelled areas (background, faces, environmental elements) also receive attention, even though they are not scored.
Image AOI contributions to other metrics
For Cognitive Demand, Engagement, and Memory, AOI contributions show how each labelled element shares in the overall score. These values always sum to 100% between labelled AOIs - they describe how the total is distributed, not what drives it.
There are no individual benchmarks for single AOIs in these metrics. Use the contributions to understand relative emphasis: if overall Cognitive Demand is below benchmark, the contributions help you identify which element is responsible.
Unlabelled elements
AOIs only cover what you have explicitly labelled. Unlabelled elements - faces, background imagery, people, textures, products in use - can still attract significant attention and influence scores. Always check the heatmap alongside the AOI scores to understand the full picture.